This is my process for outlining and completing chapters (and eventually books).
I also reveal my SUPER-SECRET (not really) strategy for overcoming all blocks.
My graphic novel The Red Talon: Lights and its prose novel adaptation have consumed me heart and soul.
April 2011 I completed the rough draft for The Red Talon: Lights (graphic novel). It was beautiful, messy, and beautiful. This year I was finally able to print out the entire script and make notes on it. Although, I’m more interested in prose writing than anything, so the novel adaptation at this moment is my top priority. But, that doesn’t mean that I can’t use my graphic novel draft. In fact, I’d be lost without it.
There are major story differences that I have to account due to the different media, but I am still able to use most, if not all of the graphic novel scenes. It’s more that I need to bulk up the story and give room for more description and story development. Otherwise, my story is still a story with all that a story needs.
In the past, people have been interested in my writing process. Of course, that may just have been because of the speed at which I was finishing things. The Office of Letters and Light is really good at kicking your ass like that… not to mention they offer SO MANY RESOURCES to get you started.
My work on The Red Talon: Lights is a little different this time around because I have all the bones laid out. So, in some ways this is the process for a first draft. (When you first write a book, your work is called a “zero draft”. That’s how bad your writing is.)
My first step was to do a retrospective outline. That’s breaking down every scene in every chapter and writing a synopsis on a card. From there, I decided which scenes to cut out, cut out and replace, or add. It was so much fun! I printed out the synopses, cut them up, and glued them to little cards! I got to color-code them too! It’s like kindergarten, but with responsibility. Best kind for someone as obsessive as me.

I also made digital copies of these cards in Scrivener. It’s great because the card is actually attached to the scene I’m writing. The whole process of outlining this novel did take time, but not as much as you might think. Actually, if you’re writing a zero-draft it should take LESS time than this did for me. That’s because in a zero draft, ideas flow freely and you should roll with them. Now, this really only works if you are working on your project consistently. Stopping and starting tends to make your flow clog. You forget what’s going on in your story and it’s a mess. Don’t do that.

ANYWAY. When I’m writing, I write a short blurb of what’s going on in the chapter. Then, I’ll start writing it. Sometimes I get it out quickly and without any hiccups. More often than not, though, I’ll hit some kind of a wall. That’s when my ultra-obsessive outlining comes in.
In order to get past this wall, I’ll break down what’s happened in the chapter by:
1) Plot Events
2) Character Motivations (For multiple characters)
The key is to find the conflict. From there you are merely problem solving with your characters. Once conflict/response/motivation was discovered, the rest of the plot points fell out naturally. It would only take 10 − 30 minutes, which is pretty good, considering you’re overcoming a block.
I used to do this in MindNode Lite.

However, yesterday I got Scapple! So as I write my chapter today, that’s what I’m going to be using.
Now, I’m really nervous because I haven’t written much in a while. College is like that. So, I’m going to go ahead and use this outlining process from the get-go.
Step 1:
Import all plot cards to Scapple. I’m not going to bother with the prologue. That’s been written and I’m fine with it.
Step 2:
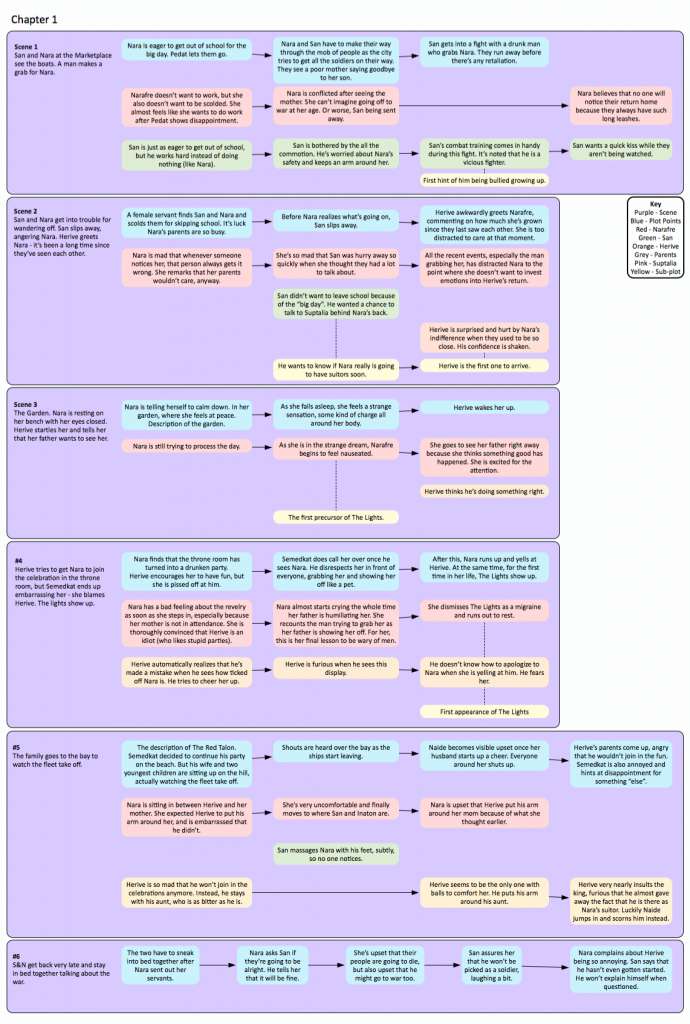
Figure out plot and any relevant character motivations. Narafre is the main character, and the story is told from her POV, so the main focus is on her motivations.
Step 3:
Color and connect!
Step 4:
I’m done!
The final project! It’s a doozy.
 |
| I can't believe that I got this program yesterday and can already do this. |
Now that I have all this planned out, I’m going to go finish this chapter!
No comments:
Post a Comment